
How To Connect .NET Application With Google Drive
17 juni 2020
Introduction
The requirement of one of the applications we were creating was to allow the files to be stored in the cloud. Such a solution may prove to be particularly useful in case of a limited client or server resources or the need for easy access to all files stored in the application. In the following article I will present a solution for connecting .NET application with Google REST API.
1. Turn on the Drive API in Google API Console
Google APIs use the OAuth 2.0 protocol for authentication and authorization. Google supports common OAuth 2.0 scenarios such as those for web server, client-side, installed, and limited-input device applications.
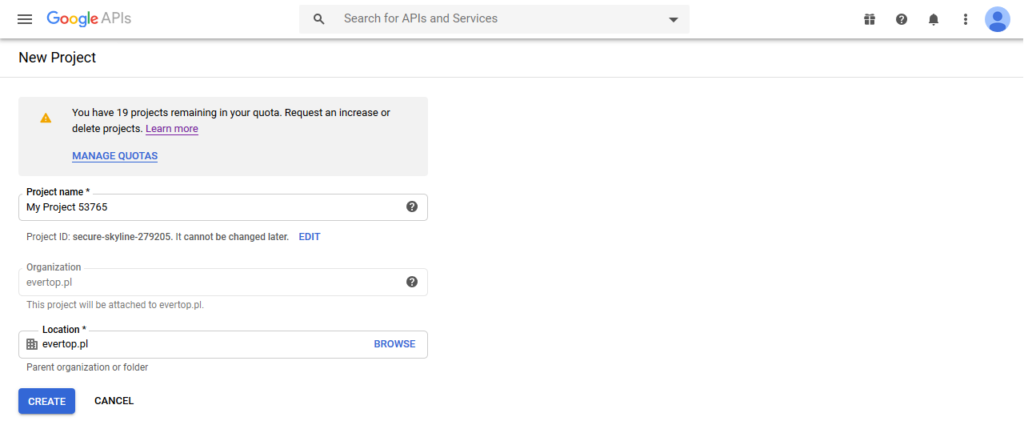
To get the access to API we have to obtain OAuth 2.0 client credentials from the Google API Console. To do this, we must first set up a project for our application. We select the Create Project link from the dashboard.

We give a name to our project to make it easy to locate in the future in the Google API Console and then we click on Create.
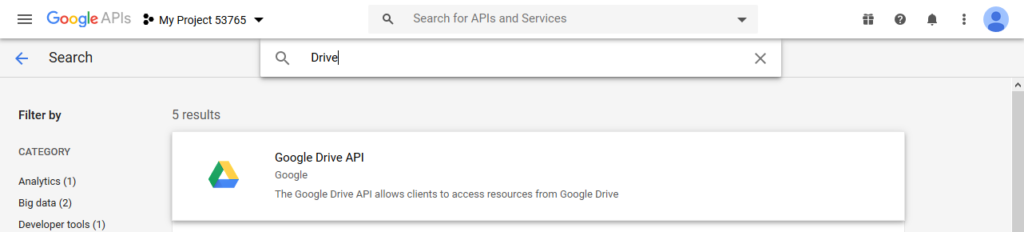
We will be redirected back to the dashboard, where we have to activate Google Drive API for our newly created project. To do this we select the API library link, which is located in the hint shown on the screen, or simply select Library from the side menu on the left.

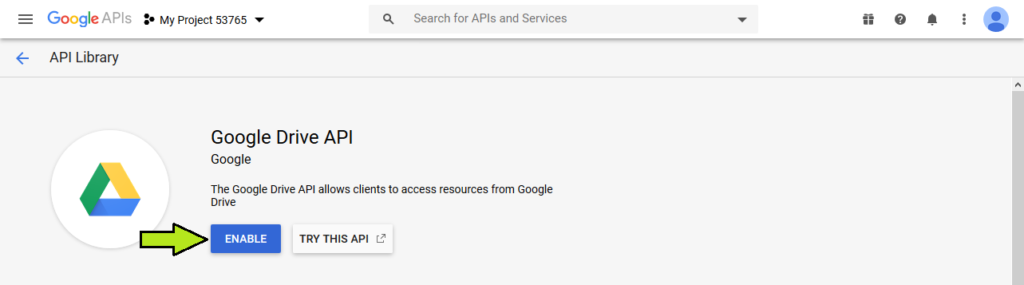
Search for Google Drive API or select it from the list.
Click on Enable.
Now since we have created a project and activated the Drive API we can create credentials appropriate for our application.
2. Client-server interaction — authenticate using user consent process
The client-server scenario is useful when we have many instances of our application, e.g. many desktop applications installed locally on end user devices.
User consent is the process that includes authentication step where the user logs in with their Google account. After logging in, the user is asked to grant permissions that our application is requesting. If the user grants permission, the Google Authorization Server sends an access token to our application (or an authorization code that can be used to obtain an access token) and the list of scopes of access granted by that token. In this scenario our application calls Google APIs on behalf of end-user.
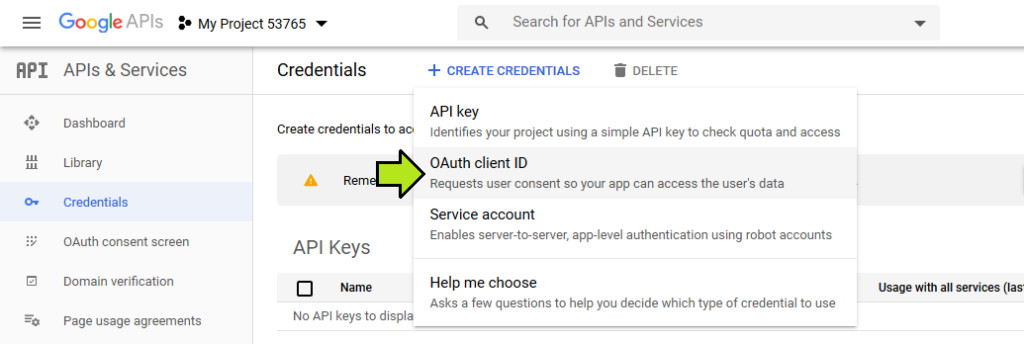
We start by creating OAuth client ID for our application. In order to do this we have to make sure that in Google Console API previously created application is chosen, and then from the menu on the left select the Credentials section. On the newly opened screen click on Create Credentials and choose OAuth client ID.
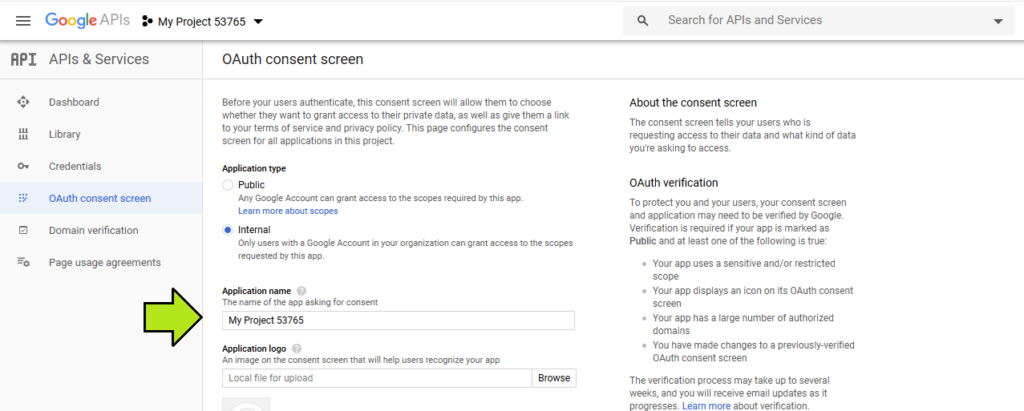
Before we can create a client id, we will be asked to configure a screen that will be displayed to users who sign in with their Google Accounts within our application. Click on Configure Consent Screen button.

Then we have to choose at which group of users our application will be targeted.
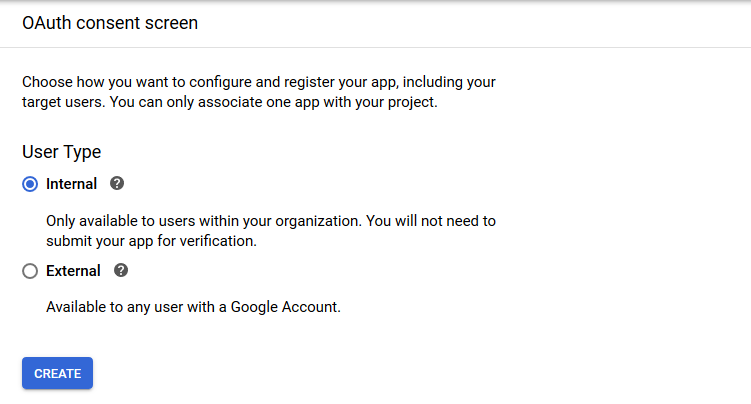
In the configuration form we provide the name of our application. It is important that it will be the name displayed to users on the screen where they will be asked for permissions.
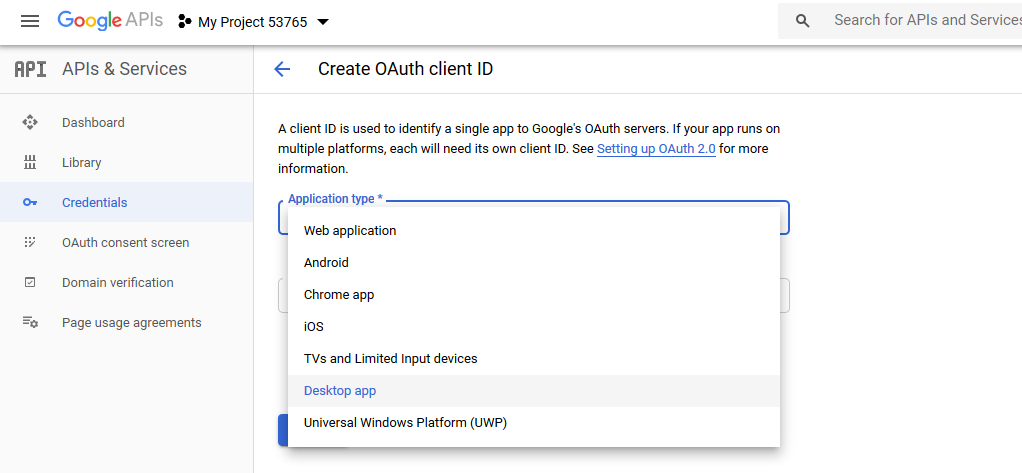
Once the configuration has been approved, we can continue creating the client id. At this point we have to decide on the type/platform of our application.
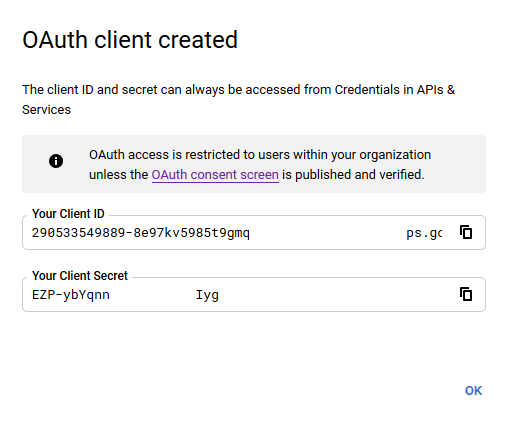
When the process is completed we will be shown a dialogue with the newly created client id and secret value. We can copy them, as they will be necessary to initialize the Google drive client. However, this is not obligatory at this point, because you can later acquire these values from the Google API Console.
2.1. Service initialization
Before we start making requests to API we have to install necessary dependencies. Proceed to NuGet Package Manager and search for: Google.Apis.Drive.v3 or open NuGet Package Manager Console and type: Install-Package Google.Apis.Drive.v3.
To make requests to Google Drive API we need the instance of the DriveService class. To initiate it, we have to pass ClientId and ClientSecret obtained before during configuration process in Google API Console. We also have to set where we want to store access token returned from Google Authorization Server.
public DriveService GetService()
{
   ClientSecrets clientSecrets = new ClientSecrets
   {
     ClientId = "ClientId", // <- change
     ClientSecret = "ClientSecret" // <- change
   };

   /* set where to save access token. The token stores the user's access and refresh tokens, and is created automatically when the authorization flow completes for the first time. */
   string tokenPath = "Token_save_location"; // <- change

   string[] scopes = { DriveService.Scope.Drive };

   UserCredential authorizedUserCredential = GoogleWebAuthorizationBroker.AuthorizeAsync(
     clientSecrets,
     scopes,
     "user",
     CancellationToken.None,
     new FileDataStore(tokenPath, true)
   ).Result;

  DriveService service = new DriveService(new BaseClientService.Initializer()
  {
    HttpClientInitializer = authorizedUserCredential,
    ApplicationName = "Name_of_your_application", // <- change
  });
  return service;
}
3. Server-server interaction — act on behalf of your application without accessing user information
The server-server scenario is useful when there is one instance of our application that is deployed on a web server and it is not possible to call up a browser to interact with users. In this solution, Google personal accounts are no longer used to access GoogleDrive. The so-called Service Account must be set up in the Google API console. This allows your application to access the drive without user interaction. Application has to prove its own identity to gain access to API and an end user doesn’t have to be involved. A private key is used to sign a request to get a new access token.
To start creating Service Account make sure that in Google Console API previously created application is chosen, and then from the menu on the left select the Credentials section. On the newly opened screen click on Create Credentials and choose Service account.

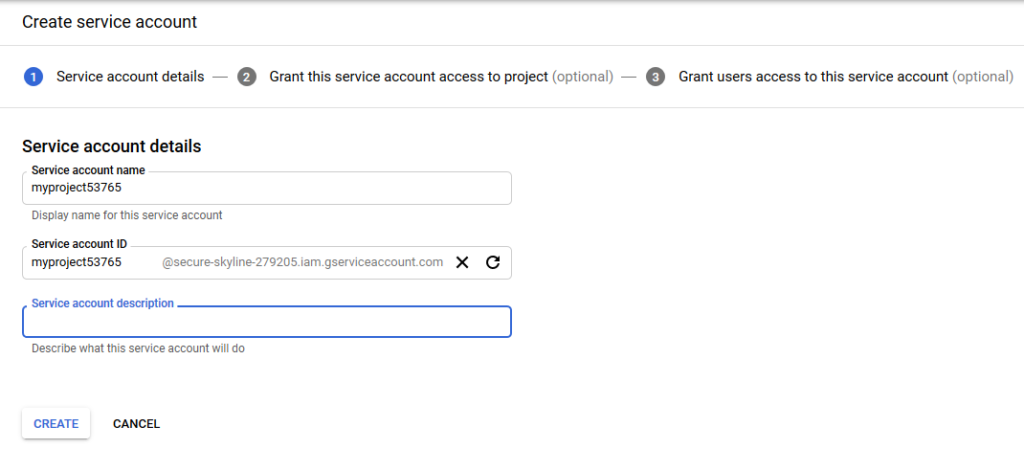
Give an account a name and an optional description that may later help us to remember what it was used for.
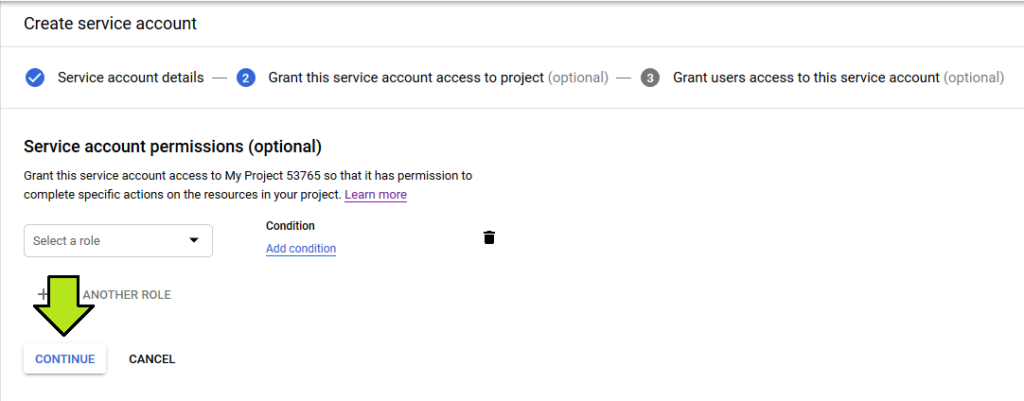
During the second step, we can give our Service account permission to specific resources within our project. This is an optional step and for simplicity of the process we can now skip it. Click on Continue.
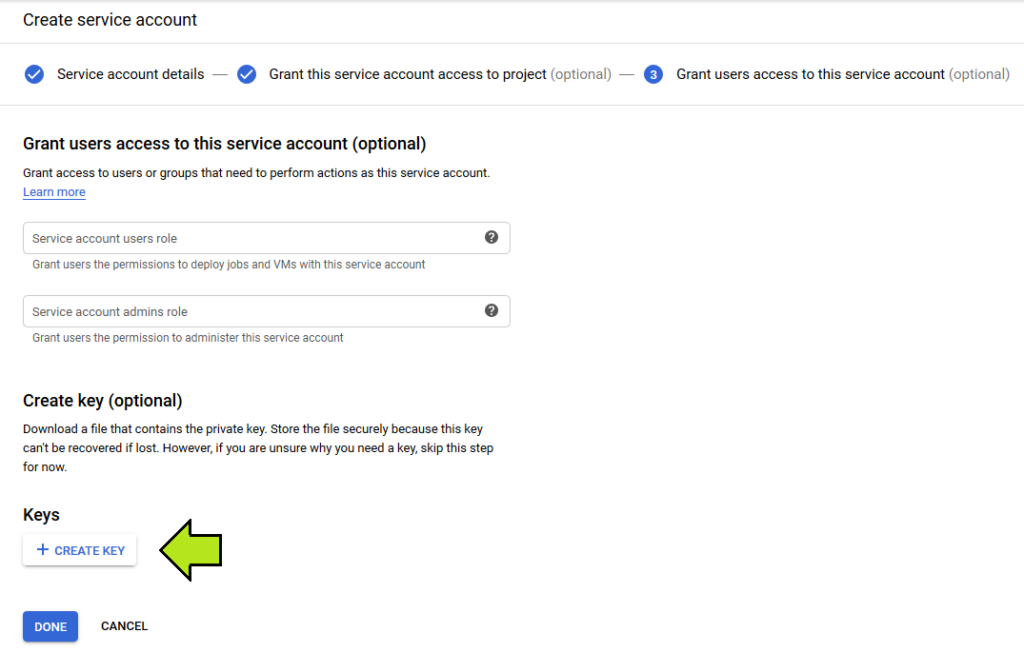
In the last step we will create a private key which will be needed during drive service initialization to recognize the identity of our application. Click on Create Key.
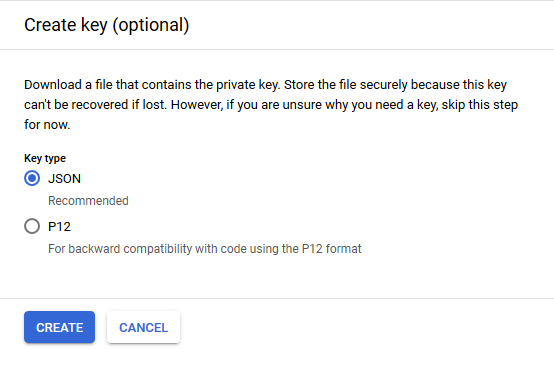
We will be asked to choose the format in which we want to download the key for our application. Choose JSON and click on Create. Right after that you will see a dialogue allowing you to save the key on your disk.
After creating Service account in Credentials tab we can see that in the section OAuth 2.0 Client IDs there is a new entry created automatically. This is the client ID that the Service Account uses and you can also find it in the private key you downloaded earlier.

After we have created a Service account it is worth mentioning another difference to the client-server scenario discussed earlier. It is not possible to simply sign into Service Account and then view files from the browser UI as it was the case with using Google personal accounts.
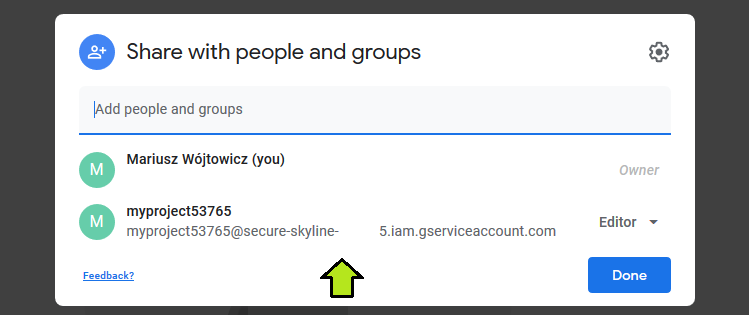
The solution is following: we create a folder on the Google Account to be used by our application and then we share it by providing our Service Account’s e-mail address.
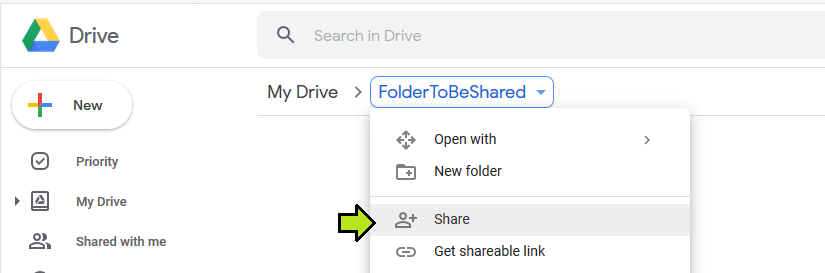
After entering Service Account’s e-mail address make sure that the account has been assigned editor privileges.
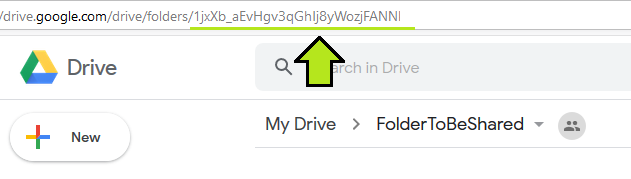
The identifier of this shared folder can be then passed on in the API requests or sewn in the configuration of our application. Thanks to this solution the files are then being uploaded to the shared folder and we have access to them from a regular Google account and browser UI.
3.1. Service initialization
After creating the Service Account we receive a .json file with credentials such as private key and client ID, which provides access to GoogleDrive. It is passed on when the service is initialized.
Make sure that Google.Apis.Drive.v3 package is installed.
public DriveService GetClient()
{
  string credenitalsJSONPath = $"private_key_path"; // <- change

  using (var stream = new FileStream(credenitalsJSONPath, FileMode.Open, FileAccess.Read))
  {
    var credentials = GoogleCredential.FromStream(stream);

    if (credentials != null)
    {
      if (credentials.IsCreateScopedRequired)
      {
        string[] scopes = { DriveService.Scope.Drive };
        credentials = credentials.CreateScoped(scopes);
      }

      var service = new DriveService(new BaseClientService.Initializer()
      {
        HttpClientInitializer = credentials,
        ApplicationName = "Name_of_your_application", // <- change
      });

      return service;
     }
  }
  return null;
}
4. Basic drive operations
Now we can move on to some useful examples. To make requests to drive API we need instance of DriveService class which is here called _driveClient.
4.1. Upload the file
When creating file upload request we specify fields that we want to get in the response body. In this example I want to get and return ‘id’ of the file, which I can later use to get download link. Full list of available fields can be found in the API documentation: https://developers.google.com/drive/api/v3/reference/files
public string UploadFile(string fileName, byte[] data, string destinationFolderId)
{
  Google.Apis.Drive.v3.Data.File uploadedFile = null;

  if (_driveClient != null)
  {
     Google.Apis.Drive.v3.Data.File metadata = new Google.Apis.Drive.v3.Data.File
     {
      Name = fileName,
      Parents = new List<string>()
     };

     if (!string.IsNullOrWhiteSpace(destinationFolderId))
     {
       metadata.Parents.Add(destinationFolderId);
     }

     var stream = new MemoryStream(data);
     var mimetype = UploadHelper.GetMimeType(fileName);

     FilesResource.CreateMediaUpload request = _driveClient.Files.Create(metadata, stream, mimetype);
     request.Fields = "id";
     request.Upload();

     uploadedFile = request.ResponseBody;
   }

   return uploadedFile?.Id;
}
4.2 Get file download link
To get the download link for a certain file specify in the request fields the ‘webContentLink’ and then execute the request.
public string GetDownloadLink(string fileId)
{
  Google.Apis.Drive.v3.Data.File fileResponse = null;

  if (_driveClient != null && !string.IsNullOrWhiteSpace(fileId))
  {
    FilesResource.GetRequest getRequest = _driveClient.Files.Get(fileId);
    getRequest.Fields = "webContentLink";

    fileResponse = getRequest.Execute();
  }

  return fileResponse?.WebContentLink;
}
Summary
In the modern world the use of the cloud has become our everyday life. We often do it without even being aware of it. Using solutions such as Google Drive API allows our applications not to fall behind this trend.