
How To Secure The Application With Spring Security Using The JWT And MySQL Database?
24 June 2020

Introduction
1. Spring Security
Spring Security is a framework that provides a set of tools to secure the created application and to manage access to its resources. It allows you to configure freely the authentication and authorization process. Spring Security supports many authorization ways like Basic Authentication, JWT, OAuth2, OpenID, LDAP etc. The main advantage of the methods that I want to present is an easy and quick configuration with a small amount of code lines.
2. JSON Web Token
JWT (JSON Web Token) is an easy way to share information between parties as a JSON object which is encrypted with some algorithm. Finally, we have a string of characters which contains three parts separated by a dot.
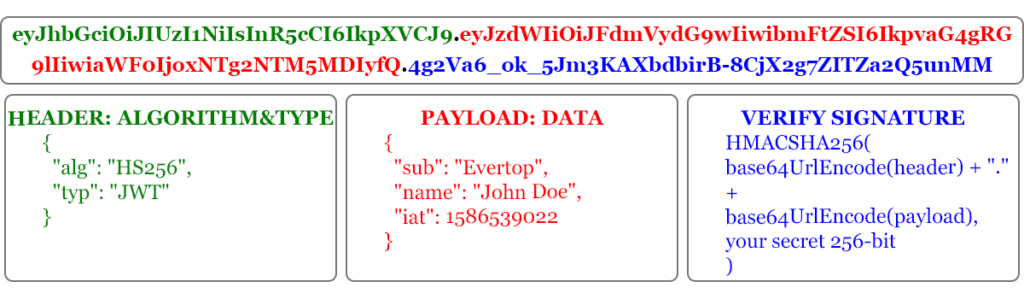
Each JWT has its expiration date. We may hash a signature with a secret key and check its authenticity. JWTs are mainly useful in authorization and information exchange. More details you may find on https://jwt.io/introduction/.
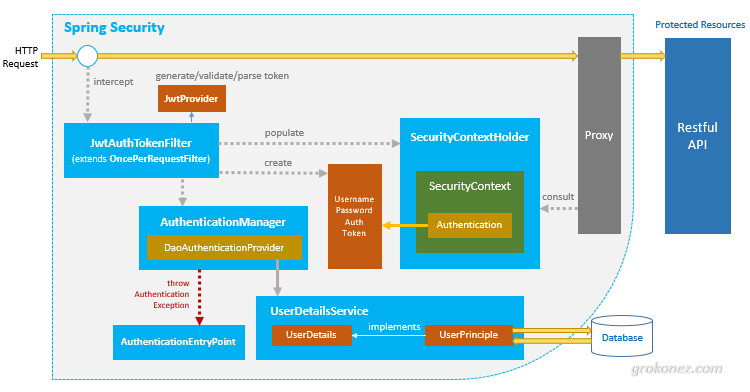
3. General working scheme Spring Security with JWT and database
Below we can see the Spring Security operating scheme using a JWT and database which we will create.
First steps
1. Create a project
This article is based on Spring Boot framework. We need to create a new Spring Boot project with Maven and add some necessary dependency. All dependencies we can find on https://spring.io/projects/spring-boot and https://mvnrepository.com/.
To start with, let’s add dependencies Spring Web and Spring Security to our Project Object Model file (pom.xml) and add annotation @EnableWebSecurity in the main class of application. That’s all we need to get started.
We are interested in checking our users in the database so we have to add Spring Data JPA and MySQL Driver for easy access to our database. In this project we will use a mySQL database. The added dependencies need a database configuration, I prefer to add it in a properties file. We should add spring.datasource.url, spring.datasource.username, spring.datasource.password properties.
Last dependency which we need is a JSON Web Token Support For The JVM, which contains the method of building and parsing a JWT.
Finally, our application should looks like this:
    <dependencies>
        <dependency>
            <groupId>org.springframework.boot</groupId>
            <artifactId>spring-boot-starter-web</artifactId>
        </dependency>
        <dependency>
            <groupId>org.springframework.boot</groupId>
            <artifactId>spring-boot-starter-security</artifactId>
        </dependency>
        <dependency>
            <groupId>io.jsonwebtoken</groupId>
            <artifactId>jjwt</artifactId>
            <version>0.9.1</version>
        </dependency>
        <dependency>
            <groupId>org.springframework.boot</groupId>
            <artifactId>spring-boot-starter-data-jpa</artifactId>
        </dependency>
        <dependency>
            <groupId>mysql</groupId>
            <artifactId>mysql-connector-java</artifactId>
            <scope>runtime</scope>
        </dependency>
    </dependencies>
spring.datasource.url=jdbc:mysql://localhost:3306/sse?useSSL=true&useJDBCCompliantTimezoneShift=true&useLegacyDatetimeCode=false&serverTimezone=Europe/Warsaw&autoReconnect=true spring.datasource.username=root spring.datasource.password=root spring.jpa.hibernate.ddl-auto=update
@SpringBootApplication
@EnableWebSecurity
public class SpringSecurityExampleApplication {

    public static void main(String[] args) {
        SpringApplication.run(SpringSecurityExampleApplication.class, args);
    }

}
2. Quick review with Spring Security
Before we start further configuration we have to explain one interesting effect of our work. At this moment our exposed REST API are secured. Standard username is “user” and the password will be generated every time when our application is built and shown on terminal. If this is your first time with Spring Security, you can perform several tests, create simply REST API and send the request on this endpoint. You will get response with 401 status and Unauthorized error. If you add user/user and password/generated password (key/value) headers the Spring Security should authorize you and allow you to get access to this endpoint. We may configure default user in application.properties file adding spring.security.user.name and spring.security.user.password parameters.
We can also create simply configuration class and override configure methods from WebSerurityConfigurerAdapter.
@Configuration
public class SecurityConfig extends WebSecurityConfigurerAdapter {

    @Bean
    PasswordEncoder passwordEncoder() {
        return new BCryptPasswordEncoder();
    }

    @Override
    protected void configure(HttpSecurity httpSecurity) throws Exception {
        httpSecurity.csrf().disable()
                .authorizeRequests()
                .antMatchers("/hello").permitAll()
                .anyRequest().authenticated()
                .and().httpBasic();
    }

    @Override
    protected void configure(AuthenticationManagerBuilder auth) throws Exception {
        auth.inMemoryAuthentication()
                .withUser("user1")
                .password(passwordEncoder().encode("pass1"))
                .roles("ADMIN")
                .and()
                .withUser("user2")
                .password(passwordEncoder().encode("pass2"))
                .roles("USER");
    }
}
This configurations means:
- disable CRSF feature (Cross-site request forgery),
- add permission for all users to „/all” endpoint access,
- any other requests need an authorized user,
- allow users to use HTTP basic authentication,
- create 2 users with username, password and authorities,
- configure PasswordEncoder which is necessary in new Spring Boot applications.
Develop a project
1. Entities class
In the next steps we will need the class of a user entity which has a collection with the list of user roles and, additionally, the class that is a user repository. I created three very simple classes.
@Entity
public class User {

    @Id
    @GeneratedValue(strategy = GenerationType.IDENTITY)
    private Long id;
    private String username;
    private String password;
    private String email;
    @ManyToMany(cascade = CascadeType.PERSIST, fetch = FetchType.EAGER)
    private List<Role> roles;

    // contructors
    // getters
    // setters

}
@Entity
public class Role {
@Id
@GeneratedValue(strategy = GenerationType.IDENTITY)
private Long id;
private String name;
// contructors
// getters
// setters
}public interface UserRepository extends JpaRepository<User, Long> {
Optional<User> findByUsername(String username);
}2. Configuration
Spring Security provides a lot of classes which allow for a high customization authentication and access-control of our application. One of them are the UserDetailsService and the PasswordEncoder interface and WebSecurityConfigurerAdapter class.
So let’s create again a bean with @Configuration annotation and set up the implementation of PasswordEncoder interface. Spring Security has a lot of them but I’ll use BcryptPasswordEncoder. Our class looks like below:
@Configuration
public class PasswordEncoderConfig {

    @Bean
    public PasswordEncoder passwordEncoder() {
        return new BCryptPasswordEncoder();
    }

}
Next step will connect our database and transfer the created user to the spring security context. Let’s create a UserDetailsServiceImpl class which implements a UserDetailsService interface. Annotate this bean with @Service annotation. We have to override loadUserByUsername method. It’s a functional interface because it has only one method to override so we may use a lambda expression. This method returns any class which implements a UserDetail interface and will present us our user in a security context. We return a basic User class from Spring Security package.
@Service
public class UserDetailsServiceImpl implements UserDetailsService {

    private UserRepository userRepository;

    public UserDetailsServiceImpl(UserRepository userRepository) {
        this.userRepository = userRepository;
    }

    @Override
    public UserDetails loadUserByUsername(String username) throws UsernameNotFoundException {
        return userRepository.findByUsername(username)
                .map(user -> new User(user.getUsername(),
                        user.getPassword(),
                        user.getRoles().stream()
                                .map(role -> new SimpleGrantedAuthority(role.getName()))
                                .collect(Collectors.toList())))
                .orElseThrow(() -> new EntityExistsException("User " + username + " doesn't exist in database"));
    }
}
By the way, we may also implement UserDetails interface to our User entity class and override getAuthorities() method in this way:
@Entity
public class User implements UserDetails {

    @Id
    @GeneratedValue(strategy = GenerationType.IDENTITY)
    private Long id;
    @Column(unique = true)
    private String username;
    private String password;
    private String email;
    @ManyToMany(fetch = FetchType.EAGER)
    private List<Role> roles;
    @CreatedBy
    private String createdBy;
    private boolean accountNonExpired = true;
    private boolean accountNonLocked = true;
    private boolean credentialsNonExpired = true;
    private boolean enabled = true;

    @Override
    public Collection<? extends GrantedAuthority> getAuthorities() {
        return roles.stream()
                .map(role -> new SimpleGrantedAuthority(role.getName()))
                .collect(Collectors.toList());
    }
So now our loadUserByUsername method will look more clearly.
    @Override
    public UserDetails loadUserByUsername(String username) throws UsernameNotFoundException {
        return userRepository.findByUsername(username)
                .orElseThrow(() -> new EntityExistsException("User " + username + " doesn't exist"));
    }
In this method we are able to fetch our user data from any database, file or other webservice which provides it and passes it on to Spring Security.
Finally, we may explain Spring Security to use implementations which we created. To do this, let’s create a SecurityConfig class which extends a WebSecurityConfigurerAdapter class (similar like on Quick review with Spring Security step) and override configure (AuthenticationManagerBuilder auth) and configure(HttpSecurity http) methors. The first one tells a AuthenticationManager something about AuthenticationProvider and how to get a user.
The second one describes Spring Security with a lot of details like memory user authentication, permission for any endpoints, login form, CORS and CRSF configure and much more that we have described before but nowwe focus on filters. Filters describe all behaviors of Spring Security between getting a request and sending a response. Add two filters which get authenticationManager like parameter and configure behaviors during authentication and authorization process. Our configuration class should look like below:
@Configuration
public class SecurityConfig extends WebSecurityConfigurerAdapter {

    private PasswordEncoder passwordEncoder;
    private UserDetailsService userDetailsService;

    public SecurityConfig(PasswordEncoder passwordEncoder, UserDetailsService userDetailsService) {
        this.passwordEncoder = passwordEncoder;
        this.userDetailsService = userDetailsService;
    }

    @Override
    protected void configure(AuthenticationManagerBuilder auth) throws Exception {
        auth.userDetailsService(userDetailsService).passwordEncoder(passwordEncoder);
    }

    @Override
    protected void configure(HttpSecurity http) throws Exception {
        http.csrf()
                .ignoringAntMatchers("/**")
                .and()
                .addFilter(new JwtAuthenticationFilter(authenticationManager()))
                .addFilter(new JwtAuthorizationFilter(authenticationManager()));
    }

}
3. JWT Service
Before we create the classes with our filters, for the code to be more transparent, let’s create JwtTokenService with static methods that:
- generate token and set header, claims, expiration time and sign it with secret key,
- verify the authenticity of the token,
- get claims from token,
- generate new token with new expiration time.
@Service
public class JwtTokenService {

    private final static int tokenExpirationTime = 30 * 60 * 1000;
    private final static String tokenKey = "ut1FfO9sSPjG1OKxVh";

    public static String generateToken(String username, Claims claims) {
        return Jwts.builder()
                .setHeaderParam("typ", "JWT")
                .setClaims(claims)
                .setSubject(username)
                .setExpiration(new Date(System.currentTimeMillis() + tokenExpirationTime))
                .signWith(SignatureAlgorithm.HS512, tokenKey)
                .compact();
    }

    public static void verifyToken(String token) throws JwtException {
        Jwts.parser()
                .setSigningKey(tokenKey)
                .parse(token.substring(7));
    }

    public static Claims getClaimsFromToken(String token) {
        return Jwts.parser()
                .setSigningKey(tokenKey)
                .parseClaimsJws(token.substring(7))
                .getBody();
    }

    public static String updateExpirationDateToken(String token) {
        Claims claims = getClaimsFromToken(token);
        return Jwts.builder()
                .setHeaderParam("typ", "JWT")
                .setClaims(claims)
                .setExpiration(new Date(System.currentTimeMillis() + tokenExpirationTime))
                .signWith(SignatureAlgorithm.HS512, tokenKey)
                .compact();
    }
}
4. Authentication filter
JwtAuthentication filter may extend UsernamePasswordAuthenticationFilter class which has a lot of methods to override. This filter describes any situations which may happen during the login process. The primary task of this filter is to send back the token after correct authentication. In achieving this goal we can override successfulAuthentication(HttpServletRequest request, HttpServletResponse response, FilterChain chain, Authentication authResult) method. In his body we create token with our JwtTokenService class static methods. JWT is sent “in the shape of the response” as Json.
public class JwtAuthenticationFilter extends UsernamePasswordAuthenticationFilter {

    private AuthenticationManager authenticationManager;

    public JwtAuthenticationFilter(AuthenticationManager authenticationManager) {
        this.setAuthenticationManager(authenticationManager);
    }

    @Override
    protected void successfulAuthentication(HttpServletRequest request, HttpServletResponse response, FilterChain chain, Authentication authResult) throws IOException, ServletException {

        Claims claims = new DefaultClaims();
        HashMap<String, Object> responseBody = new HashMap<>();

        String username = ((UserDetails) authResult.getPrincipal()).getUsername();

        List<String> authorities = authResult.getAuthorities().stream()
                .map(role -> role.getAuthority())
                .collect(Collectors.toList());
        claims.put("authorities", authorities);

        String token = JwtTokenService.generateToken(username, claims);

        responseBody.put("token", token);
        response.setContentType(MediaType.APPLICATION_JSON_VALUE);
        new ObjectMapper().writeValue(response.getWriter(), responseBody);
    }
}
By overriding the method attemptAuthentication we may set up various behaviors when a user is trying to authenticate himself, for example to describe non-default parameters taken from a request which will be used to create Username and Password Authentication or to save any login attempts in a memory. Similar effect we achieve override methors obtainUsername(HttpServletRequest request) and obtainPassword(HttpServletRequest request) separetely. UsernamePasswordAuthenticationFilter class which we extend allows to configure also all behaviors after unsuccesfull authentication and a lot of more.
    @Override
    public Authentication attemptAuthentication(HttpServletRequest request, HttpServletResponse response) throws AuthenticationException {
        return authenticationManager.authenticate(
                new UsernamePasswordAuthenticationToken(request.getParameter("email"), request.getParameter("pass")));
    }

    // or

    @Override
    protected String obtainUsername(HttpServletRequest request) {
        return request.getParameter("email");
    }

    @Override
    protected String obtainPassword(HttpServletRequest request) {
        return request.getParameter("pass");
    }
5. Authorization filter
JWTAuthorization filter may extend BasicAuthenticaticationFilter class. This filter will check every request and decide to allow access or not to a specific resource. We will be interested in doFilterInternal(HttpServletRequest request, HttpServletResponse response, FilterChain chain) method. Code below shows our implementation:
public class JwtAuthorizationFilter extends BasicAuthenticationFilter {

    public JwtAuthorizationFilter(AuthenticationManager authenticationManager) {
        super(authenticationManager);
    }

    @Override
    protected void doFilterInternal(HttpServletRequest request, HttpServletResponse response, FilterChain chain) throws IOException, ServletException {

        String token = request.getHeader("Authorization");

        if (token == null || !token.startsWith("Bearer ")) {
            SecurityContextHolder.getContext().setAuthentication(null);
            chain.doFilter(request, response);
            return;
        }

        try {
            JwtTokenService.verifyToken(token);
        } catch (JwtException e) {
            SecurityContextHolder.getContext().setAuthentication(null);
            response.setStatus(401);
            response.setContentType(MediaType.APPLICATION_JSON_VALUE);
            new ObjectMapper().writeValue(response.getWriter(), e.getMessage());
            return;
        }

        Claims claims = JwtTokenService.getClaimsFromToken(token);

        List<String> authorities = claims.get("authorities", ArrayList.class);

        List<SimpleGrantedAuthority> roleList = new ArrayList<>();
        if (authorities != null && !authorities.isEmpty()) {
            roleList = authorities.stream()
                    .map(role -> new SimpleGrantedAuthority(role))
                    .collect(Collectors.toList());
        }

        String username = claims.getSubject();
        if (username != null) {
            SecurityContextHolder.getContext().setAuthentication(new UsernamePasswordAuthenticationToken(username, null, roleList));
            chain.doFilter(request, response);
        } else {
            SecurityContextHolder.getContext().setAuthentication(null);
            response.setStatus(401);
        }

    }
}
The methodology of this implementation is quite simple. We take the Authorization header from the request, which should contain our token with the prefix “Bearer”, and then verify it with our secret key. In case of a negative result we leave the method without any change a Security Context. In case of a positive result we get username and authorities (role list) from token and set authentication in Security Contex.
6. Global Method Security
Spring Security supports authorization declaration at the method level. In this mode in a clear and legible way we define a certain level of access to each method and each end point of our API. To enable it we should add @EnableGlobalMethodSecurity(prePostEnabled = true) annotation to our SecurityConfig bean. In this way we have to secure each method separately. Below there is a simple example how to use it:
@PreAuthorize("isAuthenticated() || hasRole('ADMIN')")
@GetMapping("/all")
public List<User> allUsers() {
    return userRepository.findAll();
}
The @PreAuthorize can check for authorization before entering into method and @PostAuthorize checks for authorization after method execution. We may use the second one when authorization result depends on a returned object in the method.
In @PreAuthorize and @PostAuthorize parameters we can create boolean conditions with isAuthenticated(), isAnonymous(), hasRole(‘ROLE’) or any other boolean expresion like “object.secured == false”.
We may also create an additional method which returns a boolean value for example “@isCurrentUser(#username)” or in other class “@securityAuthorizationService.isCurrentUser(#username) “ where securityAuthorizationService is a class name.
Of course all this annotation we may use in Interfaces or abstract classes and all implementations of this method will be secured in this way.
Additional features
1. Refresh token with interceptor
Spring Web dependency supports interceptors which may help us in refreshing the token with a new expiration time. To do this we create class TokenInterceptor which implements HandlerInterceptor interface and overrides preHandle(HttpServletRequest request, HttpServletResponse response, Object handler) method. It should take the old token from the request and update it by setting a new expiry time and using the static method from JwtTokenService and then putting it in a response header. This is a very helpful method when the token expiration time is short.
@Component
public class TokenInterceptor implements HandlerInterceptor {

    @Override
    public boolean preHandle(HttpServletRequest request, HttpServletResponse response, Object handler) throws Exception {

        String token = request.getHeader("Authorization");

        if (token == null || !token.startsWith("Bearer ")) {
            return true;
        }

        String newToken = JwtTokenService.updateExpirationDateToken(token);
        response.setHeader("Authorization", newToken);
        response.setHeader("Access-control-expose-headers", "Authorization");

        return true;

    }
}
This TokenInterceptor we should register in configuration class which implements WebMvcConfigurer and override method addInterceptors(InterceptorRegistry registry).
@Configuration
public class WebMvcConfig implements WebMvcConfigurer {

    private TokenInterceptor tokenInterceptor;

    public WebMvcConfig(TokenInterceptor tokenInterceptor) {
        this.tokenInterceptor = tokenInterceptor;
    }

    @Override
    public void addInterceptors(InterceptorRegistry registry) {
        registry.addInterceptor(tokenInterceptor);
    }
2. Auditing with Spring Security Context
Spring Security Contex Holder is helpful also in database auditing. It holds an authenticated user whose name we can get. We need to add @EnableJpaAuditing annotation in our application, @EntityListeners({AuditingEntityListener.class}) annotation in our entity class and the fields in entity class with @CreatedBy and @LastmodifiedBy annotation will be filled by username from Spring Contex Holder.
@Component
public class AuditorAwareImpl implements AuditorAware<String> {

    @Override
    public Optional<String> getCurrentAuditor() {
        String username = SecurityContextHolder.getContext().getAuthentication().getName();
        if (username != null) {
            return Optional.of(username);
        }
        return Optional.empty();
    }

}
Example
The code is available on GitHub: https://github.com/szczypkam/SpringSecurityExample
Please check out a simple controller class which explains behaviors of our security implementations. Before, we had to add 2 users to our database with admin and user roles. I set up parameter CascadeType.PERSIST on @ManyToMany annotation at roles field only for the convenience and create role records with user together, without creating RoleController separately. After user created we may delete this parameter. Please remember to use password encoder during a user create.
In my code on GitHub I choose the solution to implement a UserDetails interface to my User entity, so I have to remember about fields: accountNonExpired, accountNonLocked, credentialsNonExpired and enabled, which need to receive a true value for a positive authentication. We may use this fields to manage the account activity but in this case I use default value on true.
@RestController
@RequestMapping("user")
public class UserController {
private UserRepository userRepository;
private PasswordEncoder passwordEncoder;
public UserController(UserRepository userRepository, PasswordEncoder passwordEncoder) {
this.userRepository = userRepository;
this.passwordEncoder = passwordEncoder;
}
// example A: without authentication
@GetMapping()
public String hello() {
return "Hello world!";
}
// example B: with boolean statement
@PreAuthorize("isAnonymous() && #text.length() < 6")
@GetMapping("/message/{text}")
public String hello(@PathVariable String text) {
return "Hello anonymus user!";
}
// example C: endpoint only for authenticated users
@PreAuthorize("isAuthenticated()")
@GetMapping("/all")
public List<User> getAllUsers() {
return userRepository.findAll();
}
// example D: endpoint for users with role ADMIN
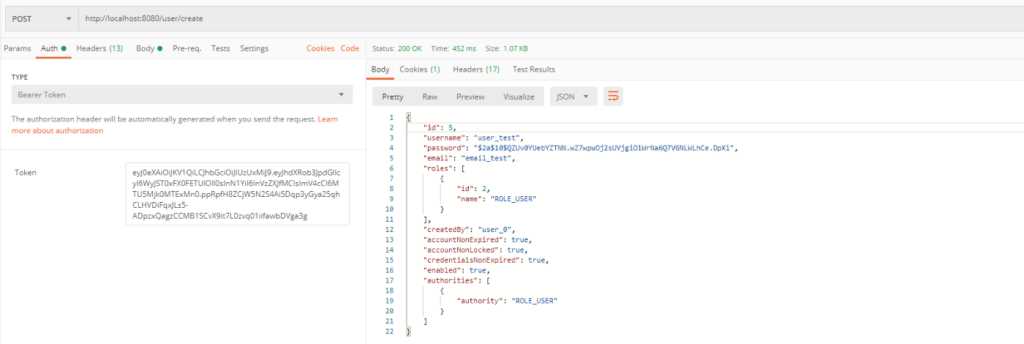
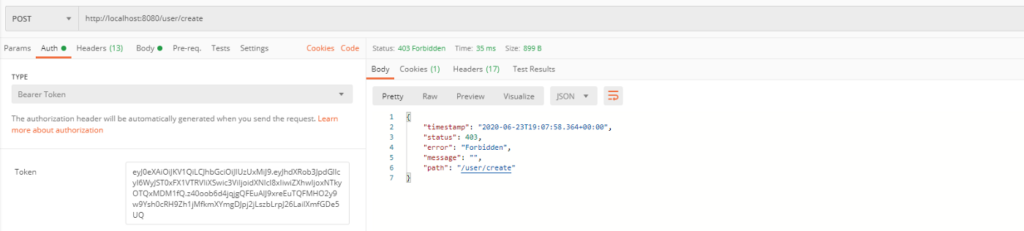
@PreAuthorize("hasRole('ADMIN')")
@PostMapping("/create")
public User createUser(@RequestBody User user) {
user.setPassword(passwordEncoder.encode(user.getPassword()));
return userRepository.save(user);
}
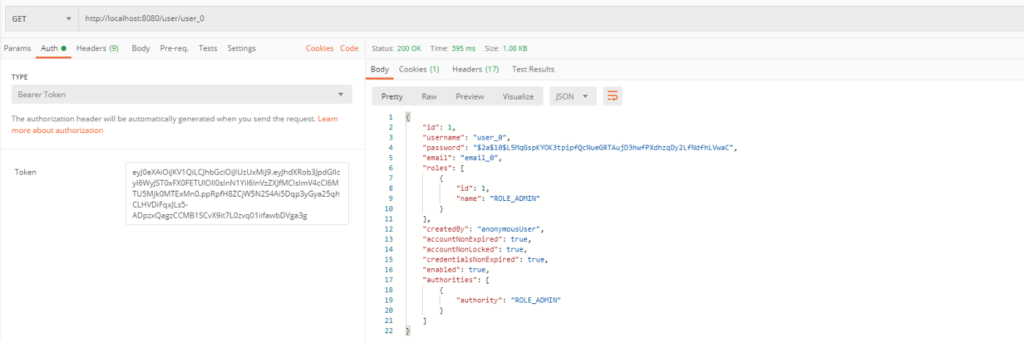
// example E: endpoint for authenticated users which ask about his own User
@PreAuthorize("isAuthenticated() && @securityAuthorizationService.isCurrentUser(#username)")
@GetMapping("/{username}")
public User getUser(@PathVariable String username) {
return userRepository.findByUsername(username)
.orElseThrow(() -> new EntityExistsException("User " + username + " doesn't exist in database"));
}
// example F: other solution for example D
@PreAuthorize("isAuthenticated()")
@GetMapping("/current")
public User getUser() {
String username = SecurityContextHolder.getContext().getAuthentication().getName();
return userRepository.findByUsername(username)
.orElseThrow(() -> new EntityExistsException("Wrong username " + username + " in SecurityContexHolder"));
}
// example G: check tokenInterceptor service
@PreAuthorize("isAuthenticated()")
@GetMapping("/token")
public String checkRefreshToken() {
return "Compare old and new token";
}
}Initially, let’s check situations A, B and C. In example A everybody may send a request and get a response. It’s not a secured endpoint.

In the next example, only anonymous users which use text in path with the length less than 6 chars have the access to this endpoint.


If you send Authorization header with a token you inform application that you are an authorized user and then you won’t have access to this endpoint.
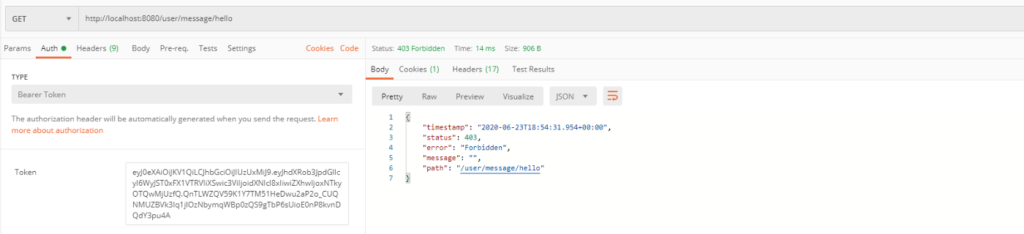
Example C is only for authorized users so you will get response with 403 error if you want to add necessary token information in headers.

For the next examples it is necessary to undergo authentication procedure in our application. To do this we need to send request on default endpoint login with form data body key-values. Its username: username and password: password of our user in database. For login we have to use POST method request. After a positive authentication our JwtAuthenticationFilter should add token to response which we will get.

So let’s try again to send a request on the endpoint from example C, but this time we add header with key „Authorization” and value „Bearer token”. This time our JwtAuthorizationFilter validates token and creates user for SecurityContext from token claims. There are 2 important things: username and roles. After positive authorization we will get response with status 200.
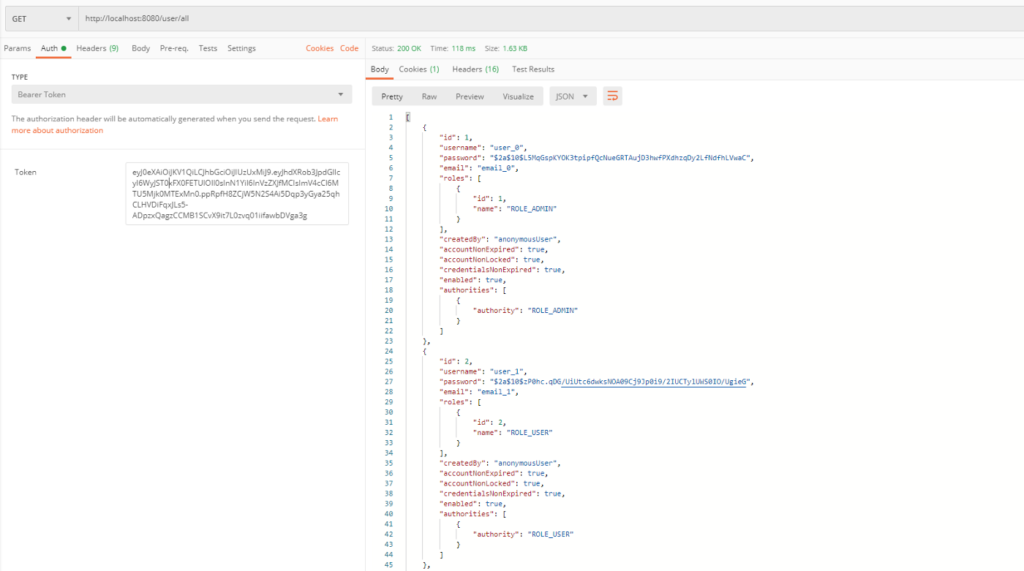
Example D is very similar like example C but this time to get the access to this endpoint we should be an authorized user and have an admin role. In my database user_0 has admin role and user_1 has user role.
Example E shows the use of function from an external class to validate the condition, which means that autenticated user may get only his own user data.
In next method we may implement a better way and get user from database by the username from security context.

In the last example we will check a refresing token by TokenInterceptor. In response we will find a header with key Authorization and new refresed token on value. We may replace old and new one tokens in every request and still to have our JWT signature with an actual expire time.

Summary
In the present time, the security of public shared routes, services, and resources is extremely important and Spring Security provides us data protection available in an easy and pleasant way. At the same time it provides huge configuration options. And the wide possibilities of any implementation of standard authentication and authorization process mechanisms makes it an extremely popular and often used framework. In addition, JWT allows you to send your authorization signature securely without using a sensitive information.